
명령 패턴은 GoF에선 요청 자체를 캡슐화한 것이다 라고 표현한다.
많이 와닿지 않는다.
게임 프로그래밍 패턴에서도 명령 패턴은 메서드 호출을 실체화한 것이다 라고 표현하는데, 이 역시 와닿지 않는다.
이는 우리가 실체화라는 단어에 대해 잘 알지 못하기 때문이다.
실체화 (reify) 에 대해
실체화라는 말은 몰라도 C#을 공부했었다면 콜백이라는 말은 알 것이다.
대리자나 이벤트가 콜백 함수를 구현하기 위한 문법이기 때문이다.
대리자나 이벤트를 사용하는 것을 보면, 마치 함수 자체를 데이터처럼 사용한다.
이 데이터처럼 사용한다는 것, 즉 객체화 되어 있다는 것이 실체화의 의미라고 보면 된다.
이렇게 실체화가 되어 변수처럼 다뤄지는 함수를 일급 함수 (First Class Function) 라고 부른다.
즉, (GoF의 표현에 따르면) ”명령 패턴은 콜백을 객체지향적으로 표현한 것”이 되겠다.
예제
다음과 같은 코드를 살펴보자.
using UnityEngine;

public class InputHandler : MonoBehaviour
{
    private void Update()
    {
        HandleInput();
    }

    public void HandleInput()
    {
        if (Input.GetKeyDown(KeyCode.Space)) Jump();
        else if (Input.GetKeyDown(KeyCode.A)) Attack();
        else if (Input.GetKeyDown(KeyCode.LeftControl)) Crouch();
        else if (Input.GetKeyDown(KeyCode.LeftShift)) Run();
    }

    void Jump()
    {
        Debug.Log("Jump");
    }

    void Attack()
    {
        Debug.Log("Attack");
    }

    void Crouch()
    {
        Debug.Log("Crouch");
    }

    void Run()
    {
        Debug.Log("Run");
    }

}
키 입력을 받는 코드이다.
해당 코드의 문제점이라 할 수 있는 것이, 키를 입력받는 부분과 행동을 실행하는 부분이 커플링이 되어있다는 점이다.
대부분의 게임에서는 키 변경을 지원하기에, 위와 같은 방식으로 작성을 하게 되면 커플링되어 있는 기능들을 분리해주지 않으면 키 변경 기능을 만들 수 없다!
분리하기 위해서 키를 입력받았을 때 수행하는 행동들을 인스턴스화 하자!
예제 1) 기본 형태의 명령 패턴
먼저 모든 행동들의 상위 클래스가 되는 인터페이스를 정의한다.
public interface Command
{
    public void Execute() {}
}
이제 각 행동마다 Command를 상속받은 하위 클래스를 만들어주면 다음과 같다.
public class JumpCommand : Command
{
    public void Execute()
    {
        Debug.Log("Jump");
    }
}

public class AttackCommand : Command
{
    public void Execute()
    {
        Debug.Log("Attack");
    }
}

public class CrouchCommand : Command
{
    public void Execute()
    {
        Debug.Log("Crouch");
    }
}

public class RunCommand : Command
{
    public void Execute()
    {
        Debug.Log("Run");
    }
}
이렇게 되면 앞서 작성했었던 InputHandler는 다음의 두 가지만 하면 된다.
- 입력과 행동을 바인딩해주는 것
- 입력을 받아 해당 입력에 매핑된 Command를 까서 그 안의 Execute를 호출해주는 역할.
그걸 코드로 작성하면 다음과 같이 된다.
using System.Collections.Generic;
using UnityEngine;

public class InputHandler : MonoBehaviour
{
    private Dictionary<KeyCode, Command> _button;

    private void Awake()
    {
        _button = new Dictionary<KeyCode, Command>();
    }

    private void Start()
    {
        // 버튼 입력과 행동 바인딩
        _button.Add(KeyCode.Space, new JumpCommand());
        _button.Add(KeyCode.A, new AttackCommand());
        _button.Add(KeyCode.LeftControl, new CrouchCommand());
        _button.Add(KeyCode.LeftShift, new RunCommand());
    }

    private void Update()
    {
        HandleInput();
    }

    public void HandleInput()
    {
        if (Input.GetKeyDown(KeyCode.Space)) _button[KeyCode.Space].Execute();
        else if (Input.GetKeyDown(KeyCode.A)) _button[KeyCode.A].Execute();
        else if (Input.GetKeyDown(KeyCode.LeftControl)) _button[KeyCode.LeftControl].Execute();
        else if (Input.GetKeyDown(KeyCode.LeftShift)) _button[KeyCode.LeftShift].Execute();
    }
}
키 입력과 기능이 분리된 것이 느껴지는가?
예제2) 액터를 인자로 넘겨주기
위 예제도 한계가 하나 있다.
어느 객체의 Command를 실행할 것인지가 미리 세팅이 되어 있어야 한다는 점이다.
어느 오브젝트에 우리가 가하는 입력을 적용시켜줄 것인지 그 인자를 기존의 Execute에서 받아줄 수 있도록 하자.
using UnityEngine;

public interface Command
{
    public void Execute(in GameObject actor) {}
}

public class JumpCommand : Command
{
    public void Execute(in GameObject actor)
    {
        Debug.Log($"{actor.name} Jump");
    }
}

public class AttackCommand : Command
{
    public void Execute(in GameObject actor)
    {
        Debug.Log($"{actor.name} Attack");
    }
}

public class CrouchCommand : Command
{
    public void Execute(in GameObject actor)
    {
        Debug.Log($"{actor.name} Crouch");
    }
}

public class RunCommand : Command
{
    public void Execute(in GameObject actor)
    {
        Debug.Log($"{actor.name} Run");
    }
}
public class InputHandler : MonoBehaviour
{
    / ...
    private GameObject _actor;

    / ...

    public void HandleInput()
    {
        if (Input.GetKeyDown(KeyCode.Space)) _button[KeyCode.Space].Execute(_actor);
        else if (Input.GetKeyDown(KeyCode.A)) _button[KeyCode.A].Execute(_actor);
        else if (Input.GetKeyDown(KeyCode.LeftControl)) _button[KeyCode.LeftControl].Execute(_actor);
        else if (Input.GetKeyDown(KeyCode.LeftShift)) _button[KeyCode.LeftShift].Execute(_actor);
    }
}
이러면 우리는 액터를 바꿔주는 것만으로 조종할 수 있는 오브젝트를 변경 가능해지는 것이다!
심지어는 AI에 의해 액터를 조종한다 했을 때, AI가 게임 오브젝트에 직접적으로 변경을 가하는 것이 아니라 Command를 한 번 거쳐서 오브젝트를 조종하는 방식으로 구현 가능해지는 것이다.
예제3) 실행 취소와 재실행
명령 패턴을 이용하여 실행취소 (Undo) 기능 역시 제작이 가능하다.
명령 패턴을 이용하여 메서드를 실체화 해놨기 때문에 이를 실행 순서대로 저장할수도 있는 것이다.
아래 코드는 이동 커맨드에서 나의 이동량을 저장하도록 만든 코드이다.
using UnityEngine;

public interface Command
{
    public void Execute() {}
    public void Undo() {}
}

public class MoveUnitCommand : Command
{
    private Transform _unit;
    private Vector3 _delta;

    public MoveUnitCommand(Transform unit, Vector3 delta)
    {
        _unit = unit;
        _delta = delta;
    }

    public void Execute()
    {
        _unit.Translate(_delta);
    }

    public void Undo()
    {
        _unit.Translate(-1 * _delta);
    }
}
이렇게 하면 InputHandler에서는 이동 명령을 호출할 때마다 새로운 MoveUnitCommand를 생성하고, 그 생성된 MoveUnitCommand를 저장함으로써 Undo를 할 수가 있는 것이다.
using UnityEngine;

public class InputHandler : MonoBehaviour
{
    private GameObject _actor;

    private void Awake()
    {
        _actor = gameObject;
    }

    private void Update()
    {
        HandleInput();
    }

    public Command HandleInput()
    {
        if (Input.GetKeyDown(KeyCode.UpArrow))
        {
            Command UpArrow = new MoveUnitCommand(_actor.transform, Vector3.up * Time.deltaTime);
            return UpArrow;
        }

        return null;
    }
}
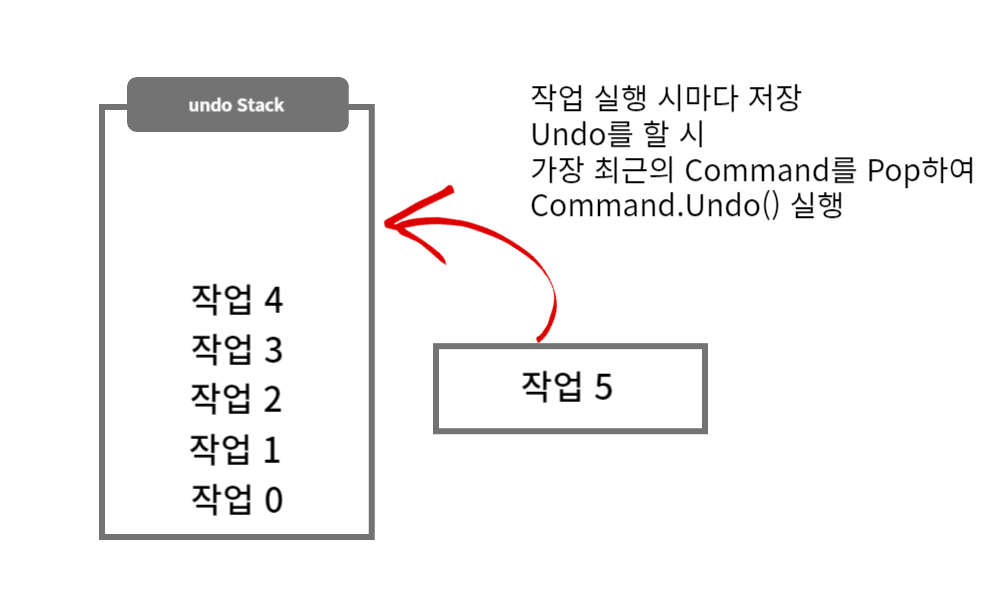
보통은 undo를 하기 위한 스택과 redo를 하기 위한 스택을 각각 둬서 해결할듯 하다.
Uploaded by N2T
'개발 > 게임 디자인 패턴' 카테고리의 다른 글
| 게임 디자인 패턴 5. 싱글턴 패턴 (Singleton Pattern) (1) | 2023.10.27 |
|---|---|
| 게임 디자인 패턴 4. 프로토타입 (Prototype) (0) | 2023.10.26 |
| 게임 디자인 패턴 3. 관찰자 패턴 (Observer Pattern) (0) | 2023.10.25 |
| 게임 디자인 패턴 2. 경량 패턴 (Flyweight Pattern) (0) | 2023.10.24 |
| 게임 디자인 패턴 0. 디자인 패턴에 대해 (1) | 2023.10.23 |
